 Backup
Basic Information
Mobile Apps
FAQ
General Information
Livedrive Backup
Mobile Apps
Web Portal
Technical Help
Backup
Mobile Devices
Billing
My Account
Getting Started with Livedrive Backup
Windows Guide
Windows Users: How Do I Set Up Backup for the First Time?
When you install Livedrive on a computer you are taken through the set up process.
The set up of Backup occurs after the installation is complete - once install, you are required to select your files & folders for backup.
Let's get you started......
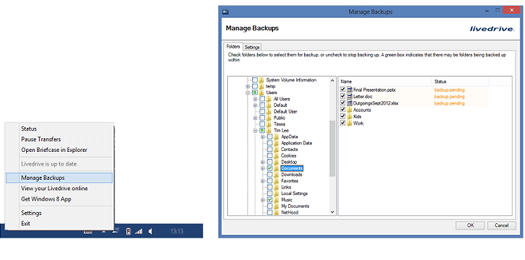
- Once Livedrive is installed, click on the Livedrive icon on your toolbar located near the date and time
- Click on Manage Backups
- Expand your C:/ drive
- Expand your Users folder
- Expand your username folder
- Select the data files and folders you wish to backup
- Click OK
Please note: Livedrive only stores raw data files (documents, music, videos, pictures). We do not backup or store backups of entire hard drives, system files or folders, applications, etc.
That's it! You have just created your first backup! After the initial backup is complete you can always modify the backup selection later on.
Configuring your Livedrive Backup Scheduled Scans
Once your initial backup is complete, you can set your Livedrive software to run schedule scans of your files and folders to checking for any changes made to the file.
Livedrive will upload modified files during the scan and save the file as another version.
The schedule scan can be set to backup once every hour (up to once every 48 hours), between certain times or real time.
To configure your Livedrive schedule scans
- Click on the Livedrive icon
- Click on Manage Backups
- Click on the Settings tab
- Choose your schedule scan settings

Please note
Selecting real time scans requires the application to be closed before the scan can occur. For example, if you are working on a Word document, Livedrive won't be able to back it up until you have saved and closed the file.
Real time scan: .PST - If wish to backup your Outlook .pst file with real time scan, Livedrive won't be able to back up the .PST file until you close Outlook, and if Livedrive is backing up your .PST file then Outlook will not be able to be opened.
Livedrive is not a service but an application therefore requires you to be logged in during transfer or scanning of files.
Which Operating Systems are Supported?

The Livedrive client is supported on multiple operating systems -
Windows
Windows XP and above
Windows Server 2003-2008
Mac
Mac OS X 10.6.8 and above
For all other operating systems (for example Linux) you can access stored files through the web portal.
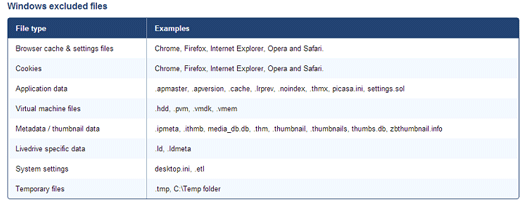
Livedrive Backup - System Exclusion List (Windows)
Livedrive keeps a list of file types that should not be backed up. These include temporary, system and browser files. These files do not contain any useful information - excluding them means you only back up the things that matter to you.
The excluded files and folders are listed below. Please note this list cannot be changed:
Windows Users: How Can I Restore My Backed Up Files?
Whether you want to restore you files on a new computer or are recovering files due a hard drive crash, Livedrive Restore client lets your browse your Livedrive Backup account, select any file or folder and then restore it straight to your PC!
To restore your backed up files and folders
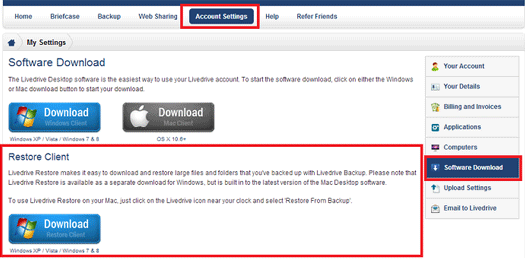
- Login into your web portal
- Click on Account Settings and then click on Software Download
- Download and install the Restore Client
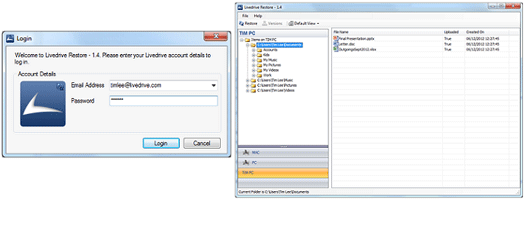
- Once installed, login within your Livedrive email address and password
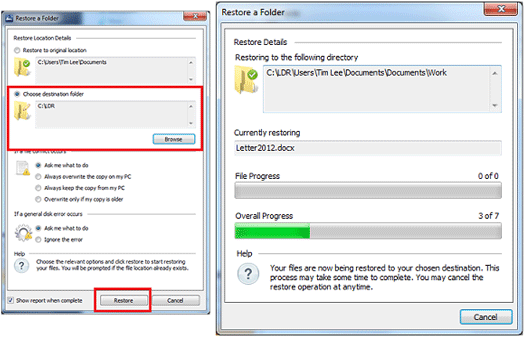
- Create a folder on your C drive or desktop called LDR
- Within the restore client, navigate to the files/folders you wish to restore and click the Restore button
- Browse to the LDR folder on your C drive
- Click OK and then click the Restore button
Restoring deleted files or folders
You can restore deleted files and folders with 30 days of deletion
To view your deleted items, click on the Default View button and select Show Deleted Items.
Once enabled, simply follow the instructions above to restore your deleted files or folders.
Windows Users: How to Edit Your Backup File/Folder Selection
You can amend your backup selection after your initial backup is complete.
To add a file or folder to the backup selection:
Please note: only select raw data files (documents, videos, music, etc). Do not select your entire user folder or applications, downloads, library, etc.
Method 1
- Click on the Livedrive icon
- Select Manage Backups
- Expand your C:\ and your Users folder
- Find your username
- Select the file or folder you wish to add to backup
- Click OK
Method 2
- Right click on the folder
- Select Livedrive
- Then click Backup with Livedrive Backup
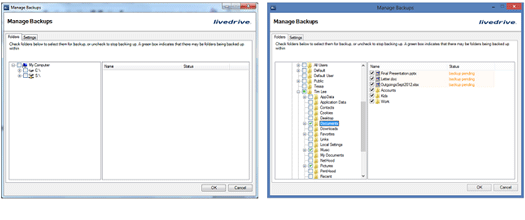
To review or modify the list of files or folders you backup, simply open the Livedrive Manage Backups window.
Any files removed from your backup selection will be marked as deleted online, and will be held for for 30 days before being permanently removed from our servers.