 Backup
Basic Information
Mobile Apps
FAQ
General Information
Livedrive Backup
Mobile Apps
Web Portal
Technical Help
Backup
Mobile Devices
Billing
My Account
Livedrive Backup
Mac Guide
Configuring your Livedrive Backup Scheduled Scans
Once your initial backup is complete, you can set your Livedrive software to run schedule scans of your files and folders to checking for any changes made to the file.
Livedrive will upload modified files during the scan and save the file as another version.
The schedule scan can be set to backup once every hour (up to once every 48 hours), between certain times or real time.
To configure your Livedrive schedule scans
- Click on the Livedrive icon
- Select Manage Backups
- Click on the Settings tab
- Choose your schedule scan settings

Please note
Selecting real time scans requires the application to be closed before the scan can occur. For example, if you are working on a Word document, Livedrive won't be able to back it up until you have saved and closed the file.
Real time scan: .PST - If wish to backup your Outlook .pst file with real time scan, Livedrive won't be able to back up the .PST file until you close Outlook, and if Livedrive is backing up your .PST file then Outlook will not be able to be opened.
Livedrive is not a service but an application therefore requires you to be logged in during transfer or scanning of files.
Can I Backup My Entire Drive?
Livedrive is not designed to backup system or program files, only your personal documents and data. The software automatically selects default folders during the initial setup however you can always modify the backup selection at any time.
Both the operating system and the programs running on it must be reinstalled in the event of a hardware failure and therefore backing up these have very little value in such an event.
In such a case you should reinstall your operating system from the discs provided by your manufacturer, and then restore your files from our servers.
For more information on which files should not be backed up, click here.
How Do I Restore a Deleted Backup File?
If you delete a backed up file or folder from your computer, it can be retrieved from our servers within 30 days.
Deleted files can be restore through the restore client.
For Windows users, please click here.
For Mac users, please click here.
Removal of Livedrive Backup Sets
You can stop Livedrive from backing up individual items from your backup by deselecting the items from the Manage Backups window.
For Windows users, please click here.
For Mac users, please click here.
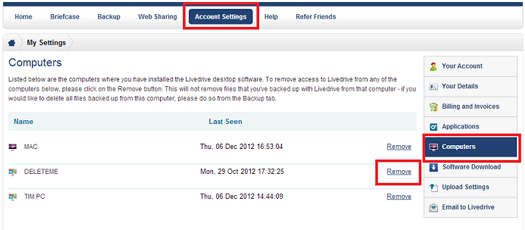
Removing a backup set from your web portal
The re-instatement of this capability is planned to be issued in a future release. If you wish to remove a computer, i.e. the entire backup set for a computer:
1. Rename Computer
Login to your web portal
Click on Backup
Select the backup set you wish to remove and right click the icon
Select Rename and enter DELETEME

2. Removing Connection to Livedrive Servers
Click on Account Settings
Then select Computers
Click on the Remove link on the DELETEME computer
3. Contact Our Support Team
Send our support team an email at the following email address THISEMAIL@ascentive.com to request removal of your backup set.
Please note: Steps 1 and 2 above must be completed before you contact our support team.
Backing up the same computer
If you wish to backup the SAME computer after it has been removed from your account, you are required to uninstall/reinstall the Livedrive Software.
For Windows users, click here.
For Mac users, click here.
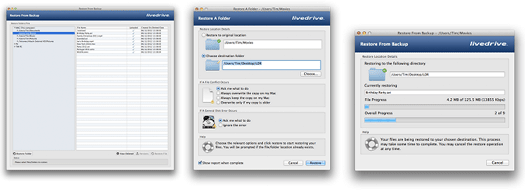
Mac Users: How Can I Restore My Backed Up Files?
- Click on the Livedrive icon
- Then click on Restore From Backup
- Create a folder on your HD drive or desktop called LDR
- Within the restore client, navigate to the files/folders you wish to restore and click the Restore Folder or Restore File button
- Click Choose... and navigate to the LDR folder on your HD drive
- Click Open and then click the Restore button
Restoring deleted files or folders
You can restore deleted files and folders restore with 30 days of deletion
To view your deleted items, click on the View Deleted button.
Once enabled, simply follow the instructions above to restore your deleted files or folders.
Can I Backup my Emails?
Most email clients store the emails in a file or folder.
For Outlook you will need to backup the local .PST file(s).
If you know where this is you can simply add the folder to your backup selection.
For Windows users, click here for information on adjusting your backup selection.
For Mac users, click here for information on adjusting your backup selection.
You will need to ensure you are using the most recent version of the client and
that it is set to scheduled, not real time, backup.
Please note that you can only backup emails where they are stored on your computer.
If you use Exchange then you will have a .ost file on your local machine and this file cannot be backed up using VSS.
Your emails will be stored on the Exchange mail server and will need to be backed up on that machine.
Can I Backup External USB Hard Drives?
 You can use Livedrive Backup with external USB HD as long as they retain the same drive letter (Windows PCs) or mount point (Mac).
As Backup is mirrored copy of the files/folders you select, you must ensure that the device is attached to your computer when running Livedrive.
If the device is disconnected whilst Livedrive is running, then the previously uploaded files will be marked for deletion on your web portal.
Users may, therefore, wish to instead copy their files to their Livedrive Briefcase and then work from the Briefcase.
Tips when backing up your external USB HD
- Ensure that you let the scan totally complete before unplugging the device. If you unplug during a scan then Livedrive will start the deleting your external USB files from your web portal.
- If your plugging in a different external HD you need to ensure that the drive letter or mount point is not re-assigned otherwise Livedrive will see this as the same drive but with all data removed and will begin deleting the data from the Backup set stored on the servers.
- Ensure that the external HD is attached when running Livedrive.
- It is possible to detach the external HD once Livedrive is stopped. You must attach the device when starting up Livedrive.
For Windows Users, to backup your external HD please click here.
For Mac Users, to backup your external HD please click here.
For network drives/NAS devices please see our article on backing up network drives/NAS devices.
Please note: we do not support the backup of removable or portable media (e.g. pen drives, CDs, DVDs, flash drives, mobile devices, iPods, etc) due to the way the Operating Systems categorises the devices. Whereas external HDs are read by the OS as local hard drives and therefore these can be backed up with the Livedrive software.
Can I Backup My Exchange or SQL Server?
As Exchange and SQL are live databases, our VSS service used with our software is not compatible to backup these types of databases.
We do not support backup of any live databases (Exchange, SQL, SAGE, etc).
We hope to rectify this in a future release.
For now, if you wish to backup an Exchange or SQL server, we suggest exporting a static file (shadow copy of your database) to a folder, and select this folder for backup. This is a manual process and will require the static file to be copied to the folder if changes are made to the server.
Can I Run Livedrive on a Server?
Livedrive can be used to backup your data files on a server. Livedrive is compatible with:
- Windows Server 2003-2008
- Mac 10.6.8 and above
Please note: Livedrive is not a service but an application, and requires a user to be logged into the server whilst Livedrive is running.
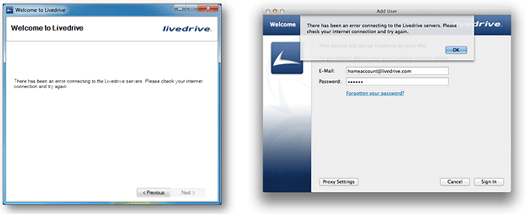
Livedrive Cannot Connect to Server
The Livedrive software uses ports 50234 and 50235, and our servers have an IP address of 82.129.64.250.
You must ensure that any firewall is configured accordingly.
If your network has a proxy server for all internet traffic you can enter the relevant information within the advanced tab of the Livedrive control panel.
You can always access your files via the web portal without installing the desktop software.
Having Connection Problems?
If the software is having trouble connecting to Livedrive, we would advise you to check the following:
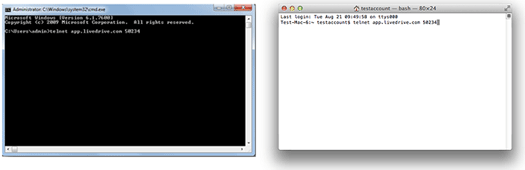
Telnet
It could be that an application or hardware firewall is blocking Livedrive's connection to the servers. To test if there is a connection available,
Open up a Telnet session
- Click on Start
- Then Applications and click Command Prompt
- Type telnet app.livedrive.com 443
- Press the [Enter] key
- Disable 'SSL' via Livedrive icon > Settings (Windows) or Preferences (Mac) > Bandwidth.
- Type telnet app.livedrive.com 50234
Windows Users
For XP, telnet is automatically available
For Vista and 7, click on Start, then go to Control Panel and select Programs And Features. Then select Turn Windows features on or off and then enable Telnet Client
For Windows 8, go to the Start menu, search Control Panel and select Programs And Features. Then select Turn Windows features on or off and then enable Telnet Client
Mac Users
Click on Finder, then Utilities and select Terminal and type the telnet connection above
Results of Test
Fail - If the Telnet test returns with an error similar to cannot connect to host, then it is a software (an application) or hardware firewall issue that you will need to resolve.
Pass - If it connects (and simply displays the command prompt with a cursor ready for the next command), then please try creating a new profile.
Creating a new profile
In some cases an application or program may be restricting Livedrive's connection to the servers from your computer. If the above has been tried and tested with no avail, please try creating a new profile with administrator rights to see whether Livedrive will connect.
Once created please install Livedrive and follow the installation process.
To create a new user profile:
Windows XP
Windows 7 & Vista
Windows 8
Mac
If Livedrive connects successfully, the issue lies within the profile and we would advise you to use the newly created profile.
Still Having Connection Problems?
If you still are having connection issues after checking your firewall settings AND creating a new user profile, please submit a ticket to our support team.
Can I Run Multiple Livedrive Accounts on One Computer?

Got multiple Livedrive accounts? Want to backup the same computer on both accounts?
You can set up your Livedrive software to switch between different Livedrive accounts using the Manage Users function in your Livedrive control panel.
For Windows users, click here for more information on using Manage Users.
For Mac users, click here for more information on using Manage Users.
Alternatively you can set different user profiles on your computer to connect to different Livedrive accounts.
Please note that you cannot connect to multiple Livedrive accounts simultaneously.
Can I Run Livedrive With Different Computer User Logins?
You can use Livedrive on different user logins.
Each user will need to configure Livedrive on their user profile by downloading the software. You can then either use the same Livedrive account on all user profiles, or pay for individual ones.
If you are using the same Livedrive account then each user is seen as a new computer and you may need to add additional devices through the web portal, in the Account Settings tab (Home Users).
For Business users, the number of computer backups are determined within your Admin portal.
Mac Users: How to Edit Your Backup File / Folder Selection
You can amend your backup selection after your initial backup is complete.
To add a file or folder to the backup selection:
Please note: only select raw data files (documents, videos, music, etc). Do not select your entire user folder or applications, downloads, library, etc.
Method 1
- Click on the Livedrive icon
- Select Manage Backups
- Expand your Users folder
- Find your username
- Select the file or folder you wish to add to backup
- Click OK
Method 2
- Select the folder you wish to backup
- Click on the Livedrive icon
- Then click on Selected Files
- Then select Backup This Folder...
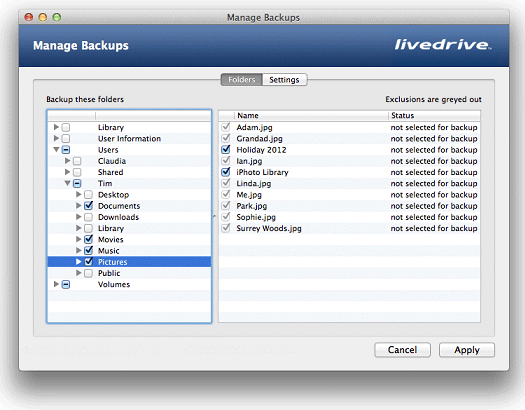
To review or modify the list of files or folders you backup, simply open the Livedrive Manage Backups window.
Any files removed from your backup selection will be marked as deleted online, and will be held for for 30 days before being permanently removed from our servers.
Mac Users: How to Uninstall Livedrive
You may need to uninstall/reinstall Livedrive if you experience any technical issues when using the Livedrive desktop client software. Once you have done uninstalled Livedrive, you can download and install the latest version of the software via your web portal.
Before performing this process please ensure that any files selected for upload to your Briefcase (if applicable) have completed fully or that you have a local copy as this process will clear the Livedrive cache and remove any partially upload files.
Before Uninstalling
- Click on the Livedrive icon
- Then select Quit
If necessary: go to Finder and then select Applications, Utilities and then click on Activity Monitor. Select LivedriveCore and click Quit Process to stop Livedrive running.
Uninstall Livedrive
Once Livedrive has stopped running, please download the uninstaller.
Delete Keychain References
To delete your keychain references, please:
- Click on Finder
- Then Applications and Utilities
- Click on select Keychain Access
- Select Livedrive and then click on File, Delete Keychain "login" and select Delete
Mac Users: Establishing a Connection for Selecting NAS Files
Having problems when backing your NAS device? Files not enabled for backup?
When connecting to a server the Mac OS default to backup your NAS is AFP (Apple Filling Protocol).
However when backing up a NAS with Livedrive, we use SMB (Server Message Block) to establish a connection.
For more information on how to backup your NAS, click here. (link to: “Mac Users: How to Backup a NAS/Network Drive”)